使用Helm3管理复杂应用的部署
使用Helm3管理复杂应用的部署
认识Helm
-
Helm的重要概念
- chart,应用的信息集合,包括各种对象的配置模板、参数定义、依赖关系、文档说明等
- Repoistory,chart仓库,存储chart的地方,并且提供了一个该 Repository 的 Chart 包的清单文件以供查询。Helm 可以同时管理多个不同的 Repository。
- release, 当 chart 被安装到 kubernetes 集群,就生成了一个 release , 是 chart 的运行实例,代表了一个正在运行的应用
helm 是包管理工具,包就是指 chart,helm 能够:
- 从零创建chart
- 与仓库交互,拉取、保存、更新 chart
- 在kubernetes集群中安装、卸载 release
- 更新、回滚、测试 release
安装与快速入门实践
下载最新的稳定版本:https://get.helm.sh/helm-v3.2.4-linux-amd64.tar.gz
或者:链接: https://pan.baidu.com/s/1zE9KE8p_RbreZoKx0gA3cg 提取码: hmfm
# k8s-master节点
$ wget https://get.helm.sh/helm-v3.2.4-linux-amd64.tar.gz
$ tar -zxf helm-v3.2.4-linux-amd64.tar.gz

$ cp linux-amd64/helm /usr/sbin/

# 验证安装
$ helm version
version.BuildInfo{Version:"v3.2.4", GitCommit:"0ad800ef43d3b826f31a5ad8dfbb4fe05d143688", GitTreeState:"clean", GoVersion:"go1.13.12"}
$ helm env

# 查看仓库
$ helm repo ls
# 添加仓库
$ helm repo add stable https://charts.bitnami.com/bitnami
# 同步最新charts信息到本地
$ helm repo update
快速入门实践:
示例一:使用helm安装wordpress应用
# helm 搜索chart包
$ helm search repo wordpress

$ kubectl create namespace wordpress
# 从仓库安装
$ helm -n wordpress install wordpress stable/wordpress --set mariadb.primary.persistence.enabled=false --set service.type=ClusterIP --set ingress.enabled=true --set persistence.enabled=false --set ingress.hostname=wordpress.luffy.com

# 查看release
$ helm -n wordpress ls
$ kubectl -n wordpress get all

# chart不适配k8s的ingress,需要添加上ingressClassName: nginx
$ kubectl -n wordpress edit ing wordpress
...
spec:
  ingressClassName: nginx
  rules:
  - host: wordpress.luffy.com
...

# 从chart仓库中把chart包下载到本地
$ helm pull stable/wordpress


# 卸载
$ helm -n wordpress uninstall wordpress
示例二:新建nginx的chart并安装
$ helm create nginx

# 从本地 安装到别的命名空间demo
$ kubectl create namespace demo
$ helm -n demo install nginx ./nginx --set replicaCount=2 --set image.tag=alpine

# 查看
$ helm ls
$ helm -n demo ls

#
$ kubectl -n demo get all
Chart的模板语法及开发
nginx的chart实现分析
格式:
$ tree nginx/
nginx/
├── charts						# 存放子chart
├── Chart.yaml					# 该chart的全局定义信息
├── templates					# chart运行所需的资源清单模板,用于和values做渲染
│   ├── deployment.yaml
│   ├── _helpers.tpl			# 定义全局的命名模板,方便在其他模板中引入使用
│   ├── hpa.yaml
│   ├── ingress.yaml
│   ├── NOTES.txt				# helm安装完成后终端的提示信息
│   ├── serviceaccount.yaml
│   ├── service.yaml
│   └── tests
│       └── test-connection.yaml
└── values.yaml					# 模板使用的默认值信息
很明显,资源清单都在templates中,数据来源于values.yaml,安装的过程就是将模板与数据融合成k8s可识别的资源清单,然后部署到k8s环境中。
$ helm install debug-nginx ./nginx --dry-run --set replicaCount=2 --debug
分析模板文件的实现:
-
引用命名模板并传递作用域
\{\{ include "nginx.fullname" . \}\}include从_helpers.tpl中引用命名模板,并传递顶级作用域.
-
内置对象
.Values
.Release.Name
.ChartRelease:该对象描述了 release 本身的相关信息,它内部有几个对象:Release.Name:release 名称Release.Namespace:release 安装到的命名空间Release.IsUpgrade:如果当前操作是升级或回滚,则该值为 trueRelease.IsInstall:如果当前操作是安装,则将其设置为 trueRelease.Revision:release 的 revision 版本号,在安装的时候,值为1,每次升级或回滚都会增加Release.Service:渲染当前模板的服务,在 Helm 上,实际上该值始终为 Helm
Values:从values.yaml文件和用户提供的 values 文件传递到模板的 Values 值Chart:获取Chart.yaml文件的内容,该文件中的任何数据都可以访问,例如\{\{ .Chart.Name \}\}-\{\{ .Chart.Version\}\}可以渲染成mychart-0.1.0
-
模板定义
\{\{- define "nginx.fullname" -\}\}
\{\{- if .Values.fullnameOverride \}\}
\{\{- .Values.fullnameOverride | trunc 63 | trimSuffix "-" \}\}
\{\{- else \}\}
\{\{- $name := default .Chart.Name .Values.nameOverride \}\}
\{\{- if contains $name .Release.Name \}\}
\{\{- .Release.Name | trunc 63 | trimSuffix "-" \}\}
\{\{- else \}\}
\{\{- printf "%s-%s" .Release.Name $name | trunc 63 | trimSuffix "-" \}\}
\{\{- end \}\}
\{\{- end \}\}
\{\{- end \}\}-
{{- 去掉左边的空格及换行,-}} 去掉右侧的空格及换行
-
示例
apiVersion: v1
kind: ConfigMap
metadata:
  name: \{\{ .Release.Name \}\}-configmap
data:
  myvalue: "Hello World"
  drink: \{\{ .Values.favorite.drink | default "tea" | quote \}\}
  food: \{\{ .Values.favorite.food | upper | quote \}\}
  \{\{ if eq .Values.favorite.drink "coffee" \}\}
  mug: true
  \{\{ end \}\}
渲染完后是:
apiVersion: v1
kind: ConfigMap
metadata:
  name: mychart-1575971172-configmap
data:
  myvalue: "Hello World"
  drink: "coffee"
  food: "PIZZA"

  mug: true
-
-
管道及方法
-
trunc表示字符串截取,63作为参数传递给trunc方法,trimSuffix表示去掉
-后缀\{\{- .Values.fullnameOverride | trunc 63 | trimSuffix "-" \}\} -
nindent表示前面的空格数
  selector:
    matchLabels:
\{\{- include "nginx.selectorLabels" . | nindent 6 \}\} -
lower表示将内容小写,quote表示用双引号引起来
value: \{\{ include "mytpl" . | lower | quote \}\}
-
-
条件判断语句每个if对应一个end
\{\{- if .Values.fullnameOverride \}\}
...
\{\{- else \}\}
...
\{\{- end \}\}
通常用来根据values.yaml中定义的开关来控制模板中的显示:
\{\{- if not .Values.autoscaling.enabled \}\}
  replicas: \{\{ .Values.replicaCount \}\}
\{\{- end \}\} -
定义变量,模板中可以通过变量名字去引用
\{\{- $name := default .Chart.Name .Values.nameOverride \}\} -
遍历values的数据
      \{\{- with .Values.nodeSelector \}\}
      nodeSelector:
        \{\{- toYaml . | nindent 8 \}\}
      \{\{- end \}\}
toYaml处理值中的转义及特殊字符, "kubernetes.io/role"=master , name="value1,value2" 类似的情况
-
default设置默认值
image: "\{\{ .Values.image.repository \}\}:\{\{ .Values.image.tag | default .Chart.AppVersion \}\}"
Helm template
hpa.yaml
\{\{- if .Values.autoscaling.enabled \}\}
apiVersion: autoscaling/v2beta1
kind: HorizontalPodAutoscaler
metadata:
  name: \{\{ include "nginx.fullname" . \}\}
  labels:
    \{\{- include "nginx.labels" . | nindent 4 \}\}
spec:
  scaleTargetRef:
    apiVersion: apps/v1
    kind: Deployment
    name: \{\{ include "nginx.fullname" . \}\}
  minReplicas: \{\{ .Values.autoscaling.minReplicas \}\}
  maxReplicas: \{\{ .Values.autoscaling.maxReplicas \}\}
  metrics:
  \{\{- if .Values.autoscaling.targetCPUUtilizationPercentage \}\}
    - type: Resource
      resource:
        name: cpu
        targetAverageUtilization: \{\{ .Values.autoscaling.targetCPUUtilizationPercentage \}\}
  \{\{- end \}\}
  \{\{- if .Values.autoscaling.targetMemoryUtilizationPercentage \}\}
    - type: Resource
      resource:
        name: memory
        targetAverageUtilization: \{\{ .Values.autoscaling.targetMemoryUtilizationPercentage \}\}
  \{\{- end \}\}
\{\{- end \}\}
创建Release的时候赋值
- set的方式
# 改变副本数和resource值
$ helm install nginx-2 ./nginx --set replicaCount=2 --set resources.limits.cpu=200m --set resources.limits.memory=256Mi
-
value文件的方式
$ cat nginx-values.yaml
resources:
  limits:
    cpu: 100m
    memory: 128Mi
  requests:
    cpu: 100m
    memory: 128Mi
autoscaling:
  enabled: true
  minReplicas: 1
  maxReplicas: 3
  targetCPUUtilizationPercentage: 80
ingress:
  enabled: true
  hosts:
    - host: chart-example.luffy.com
      paths:
      - /

$ helm install -f nginx-values.yaml nginx-3 ./nginx
使用helm template查看渲染模板
$ helm -n luffy template nginx ./nginx --set replicaCount=2 --set image.tag=alpine --set autoscaling.enabled=true
更多语法参考:
https://helm.sh/docs/topics/charts/
实战:使用Helm部署Harbor镜像及chart仓库
harbor部署
架构 https://github.com/goharbor/harbor/wiki/Architecture-Overview-of-Harbor
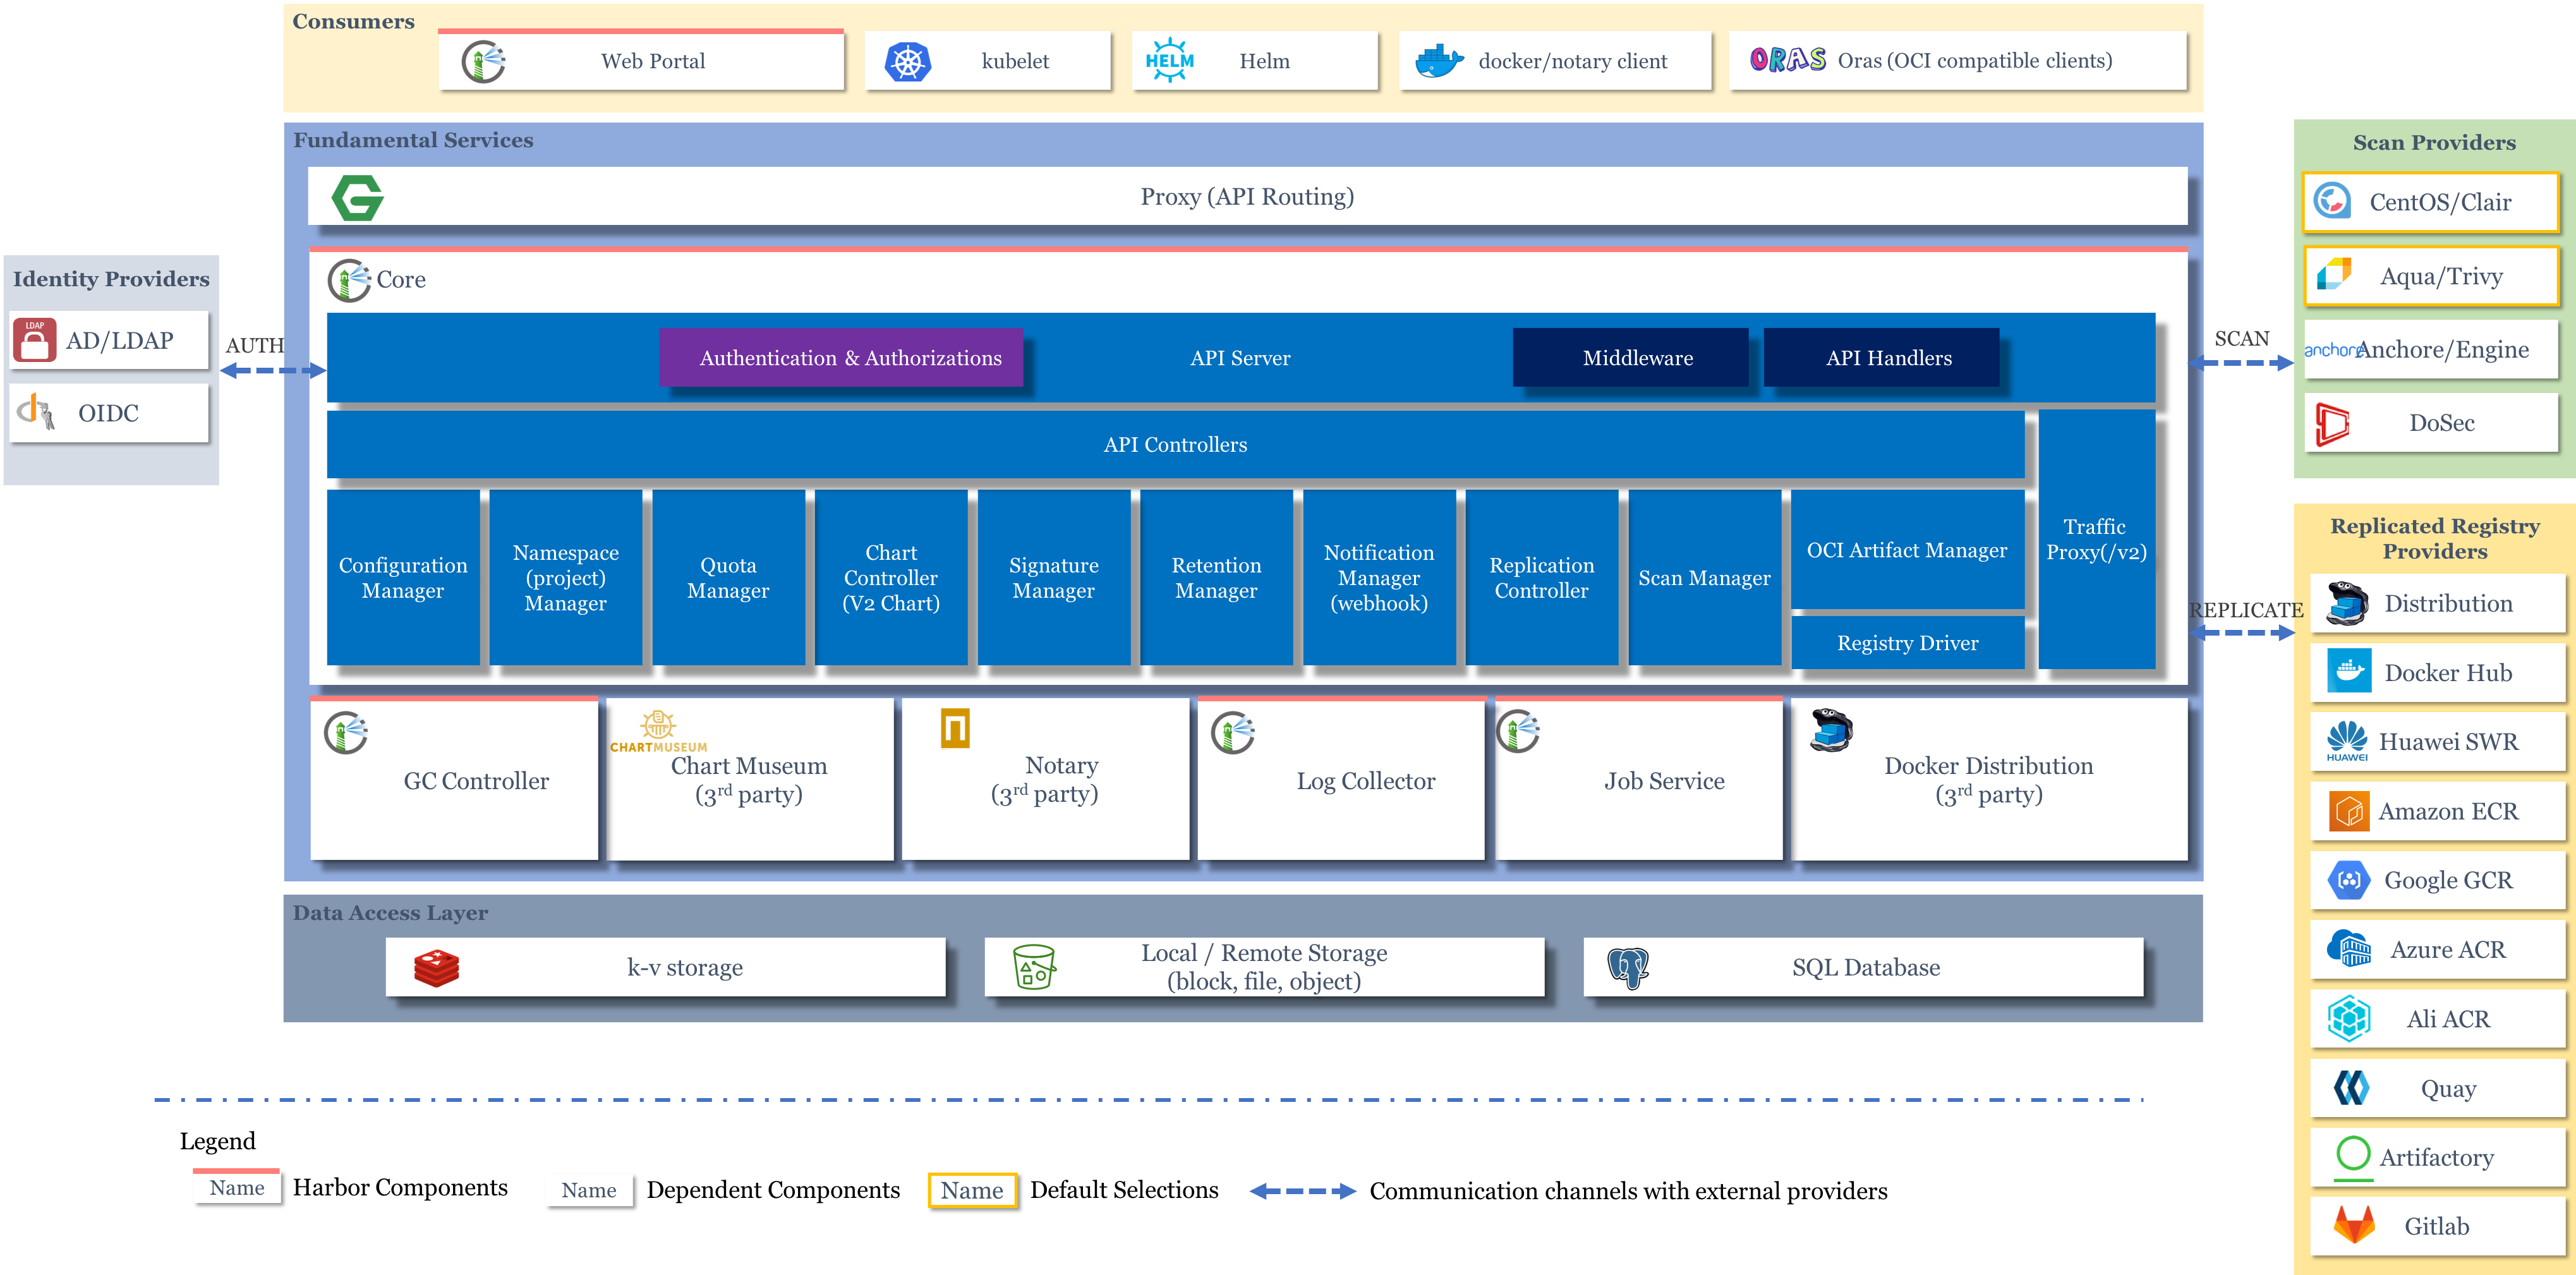
- Core,核心组件
- API Server,接收处理用户请求
- Config Manager :所有系统的配置,比如认证、邮件、证书配置等
- Project Manager:项目管理
- Quota Manager :配额管理
- Chart Controller:chart管理
- Replication Controller :镜像副本控制器,可以与不同类型的仓库实现镜像同步
- Distribution (docker registry)
- Docker Hub
- ...
- Scan Manager :扫描管理,引入第三方组件,进行镜像安全扫描
- Registry Driver :镜像仓库驱动,目前使用docker registry
- Job Service,执行异步任务,如同步镜像信息
- Log Collector,统一日志收集器,收集各模块日志
- GC Controller
- Chart Museum,chart仓库服务,第三方
- Docker Registry,镜像仓库服务
- kv-storage,redis缓存服务,job service使用,存储job metadata
- local/remote storage,存储服务,比较镜像存储
- SQL Database,postgresl,存储用户、项目等元数据
通常用作企业级镜像仓库服务,实际功能强大很多。
组件众多,因此使用helm部署
# 添加harbor chart仓库
$ helm repo add harbor https://helm.goharbor.io

# 搜索harbor的chart
$ helm search repo harbor

# 不知道如何部署,因此拉到本地
$ helm pull harbor/harbor
创建pvc
$ kubectl create namespace harbor
$ cat harbor-pvc.yaml
apiVersion: v1
kind: PersistentVolumeClaim
metadata:
  name: harbor-data
  namespace: harbor
spec:
  accessModes:
  - ReadWriteMany
  resources:
    requests:
      storage: 20Gi
  storageClassName: nfs

# 创建pvc
kubectl create -f harbor-pvc.yaml
修改harbor配置:
-
ingress访问的配置(36行和46行)
 34   ingress:
 35     hosts:
 36       core: core.harbor.domain
 37       notary: notary.harbor.domain
 38     # set to the type of ingress controller if it has specific requirements.
 39     # leave as `default` for most ingress controllers.
 40     # set to `gce` if using the GCE ingress controller
 41     # set to `ncp` if using the NCP (NSX-T Container Plugin) ingress controller
 42     # set to `alb` if using the ALB ingress controller
 43     controller: default
 44     ## Allow .Capabilities.KubeVersion.Version to be overridden while creating ingress
 45     kubeVersionOverride: ""
46 className: "nginx" -
externalURL,web访问入口,和ingress的域名相同(126行)
126 externalURL: https://harbor.luffy.com -
持久化,使用PVC对接的nfs(215,220,225,227,249,251,258,260)
204 persistence:
205   enabled: true
206   # Setting it to "keep" to avoid removing PVCs during a helm delete
207   # operation. Leaving it empty will delete PVCs after the chart deleted
208   # (this does not apply for PVCs that are created for internal database
209   # and redis components, i.e. they are never deleted automatically)
210   resourcePolicy: "keep"
211   persistentVolumeClaim:
212     registry:
213       # Use the existing PVC which must be created manually before bound,
214       # and specify the "subPath" if the PVC is shared with other components
215       existingClaim: "harbor-data"
216       # Specify the "storageClass" used to provision the volume. Or the default
217       # StorageClass will be used (the default).
218       # Set it to "-" to disable dynamic provisioning
219       storageClass: ""
220       subPath: "registry"
221       accessMode: ReadWriteOnce
222       size: 5Gi
223       annotations: {}
224     chartmuseum:
225       existingClaim: "harbor-data"
226       storageClass: ""
227       subPath: "chartmuseum"
228       accessMode: ReadWriteOnce
229       size: 5Gi
230       annotations: {}


246     # If external database is used, the following settings for database will
247     # be ignored
248     database:
249       existingClaim: "harbor-data"
250       storageClass: ""
251       subPath: "database"
252       accessMode: ReadWriteOnce
253       size: 1Gi
254       annotations: {}
255     # If external Redis is used, the following settings for Redis will
256     # be ignored
257     redis:
258       existingClaim: "harbor-data"
259       storageClass: ""
260       subPath: "redis"
261       accessMode: ReadWriteOnce
262       size: 1Gi
263       annotations: {}
264     trivy:
265       existingClaim: "harbor-data"
266       storageClass: ""
267       subPath: "trivy"
268       accessMode: ReadWriteOnce
269       size: 5Gi
270 annotations: {} -
管理员账户密码(382行)
382 harborAdminPassword: "Harbor12345!" -
trivy、notary漏洞扫描组件,暂不启用(639,711行)
637 trivy:
638   # enabled the flag to enable Trivy scanner
639   enabled: false
640   image:
641     # repository the repository for Trivy adapter image
642     repository: goharbor/trivy-adapter-photon
643     # tag the tag for Trivy adapter image
644     tag: v2.6.2


710 notary:
711   enabled: false
712   server:
713     # set the service account to be used, default if left empty
714     serviceAccountName: ""
715     # mount the service account token
716     automountServiceAccountToken: false
helm创建:
# 使用本地chart安装
$ helm -n harbor install harbor ./harbor
推送镜像到Harbor仓库
配置hosts及docker非安全仓库:
$ cat /etc/hosts
...
172.21.65.226 k8s-master harbor.luffy.com
...

$ cat /etc/docker/daemon.json
{
  "insecure-registries": [
    "172.21.51.143:5000",
    "harbor.luffy.com"
  ],
  "registry-mirrors" : [
    "https://8xpk5wnt.mirror.aliyuncs.com"
  ]
}

#
$ systemctl restart docker

# 使用账户密码登录admin/Harbor12345
$ docker login harbor.luffy.com

$ docker tag nginx:alpine harbor.luffy.com/library/nginx:alpine
$ docker push harbor.luffy.com/library/nginx:alpine


# containerd使用harbor.luffy.com
$ mkdir -p /etc/containerd/certs.d/harbor.luffy.com
$ cat /etc/containerd/certs.d/harbor.luffy.com/hosts.toml
server = "https://harbor.luffy.com"
[host."https://harbor.luffy.com"]
  capabilities = ["pull", "resolve", "push"]
  skip_verify = true

# 快速启动服务验证
$ kubectl create deployment test --image=harbor.luffy.com/library/nginx:alpine
推送chart到Harbor仓库
helm3默认没有安装helm push插件,需要手动安装。插件地址 https://github.com/chartmuseum/helm-push
安装插件:
$ helm plugin install https://github.com/chartmuseum/helm-push
离线安装:
$ mkdir helm-push
$ wget https://github.com/chartmuseum/helm-push/releases/download/v0.8.1/helm-push_0.8.1_linux_amd64.tar.gz
$ tar zxf helm-push_0.8.1_linux_amd64.tar.gz -C helm-push
$ helm plugin install ./helm-push
添加repo
$ helm repo add myharbor https://harbor.luffy.com/chartrepo/luffy
# x509错误

# 添加证书信任,根证书为配置给ingress使用的证书
$ kubectl get secret harbor-ingress -n harbor -o jsonpath="{.data.ca\.crt}" | base64 -d \\>harbor.ca.crt

$ cp harbor.ca.crt /etc/pki/ca-trust/source/anchors
$ update-ca-trust enable; update-ca-trust extract

# 再次添加
$ helm repo add luffy https://harbor.luffy.com/chartrepo/luffy --ca-file=harbor.ca.crt  --username admin --password Harbor12345!

$ helm repo ls
推送chart到仓库:
$ helm push harbor luffy --ca-file=harbor.ca.crt -u admin -p Harbor12345!